Blog Archives


Sometimes, we need read an image in assets directory to display in android, at this situation, we may need read data of image into a byte array so that we can use it in other place of our program. To read data of an image into a byte data is very simple, we can do like this:

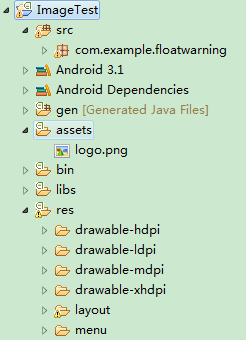
Step 1: Put an image into assets directory in Android project

Before we start to coding, we should place an image into assets directory in android project, it may like this:

image in assets directory

Step 2: Read data of image into a byte array

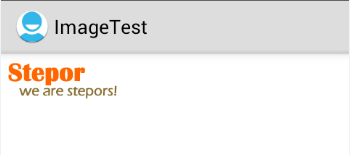
After we have place an image into assets directory, we can read its data into a byte array, this sample code realize read data of an image  in assets directory into a byte array, then display it on imageview.

show image from assets in android

Smaple code like this:


public void onCreate(Bundle savedInstanceState) {
 super.onCreate(savedInstanceState);
 setContentView(R.layout.activity_main);
 ImageView imageView = (ImageView) this.findViewById(R.id.image_id);
 //read an image in assets
 byte[] data = readImageFromAssets("logo.png");
 Bitmap bitmap = null;
 try {
 bitmap = BitmapFactory.decodeByteArray(data, 0, data.length);
 } catch(Exception e) {
 if(null != bitmap) {
 bitmap.recycle();
 bitmap = null;
 }
 }
 if(bitmap != null) {
 Drawable drawable =new BitmapDrawable(bitmap);
 imageView.setBackgroundDrawable(drawable);
 }
 }
 /** read a image into byte array from assets */
 private byte[] readImageFromAssets(String imageName) {
 InputStream is = null;
 ByteArrayOutputStream out = null;
 try {
 is = getBaseContext().getAssets().open(imageName);
 out = new ByteArrayOutputStream(1024);
 byte[] temp = new byte[1024];
 int size = 0;
 while ((size = is.read(temp)) != -1) {
 out.write(temp, 0, size);
 }
 byte[] content = out.toByteArray();

 if(is != null) {
 is.close();
 }
 if(out != null) {
 out.close();
 }
 return content;
 } catch (IOException e) {
 // TODO Auto-generated catch block
 e.printStackTrace();
 } finally {

 }
 return null;

 }


In article “2 Steps to solve problem:Can’t create handler inside thread that has not called Looper.prepare() in Android“, We know a truth: a toast can not be run in no-ui thread in android, if you should realize it you should use Looper.prepare().

How to use Looper.prepare() you may ask me, you can use it like follow steps:

Step 1: Effect of Loop.prepare() and Looper.loop()

In Anroid Looper you can get some very useful information on Loop.prepare, however, if you think that is too hard to you ,you can understand it like this.

Loop.prepare and Looper.loop() can create a ui thread, then you can run some ui process between them.

Step 2: Example of using Loop.prepare() and Looper.loop()

To understand how to use Loop.prepare() and Looper.loop(), you can read example below.

We know we can not show a toast in a no-ui thread in android, so if you run this code below, you will find a toast will be showed in ui thread.


public class TestActivity extends Activity {

 @Override
 public void onCreate(Bundle savedInstanceState){
 super.onCreate(savedInstanceState);
 this.setContentView(R.layout.test);
 Button btn = (Button) this.findViewById(R.id.back_id);
 btn.setOnClickListener(new OnClickListener() {
 public void onClick(View v) {
 new Thread(new Runnable(){

@Override
 public void run() {
 // TODO Auto-generated method stub
 Looper.prepare();
 showToast("Toast run in sub thread");
 Looper.loop();
 }

 }).start();
 }
 });
 showToast("Toast run in UI thread");
 }
 private void showToast(String msg) {
 Toast.makeText(TestActivity.this, msg, Toast.LENGTH_LONG).show();
 }
}

However, if you plan to show it in a no-ui thread,you must use key code:


Looper.prepare();
showToast("Toast run in sub thread");
Looper.loop();

Then we will create a ui thread, which can show my toast.

taost run in sub thread

Tips and Warnings:

(1) code above if you remove Loop.prepare() and Looper.loop(), this application will break down and stop.


Today when i programming a android project, i met with this problem:

Can’t create handler inside thread that has not called Looper.prepare()

From the error message, we should create a handler after calling Looper.prepare.

However, i know i have not used handler in code snippet when problem occurred.

This code snippet is:

new Thread() {
 @Override
 public void run() {
 super.run();
 String url = HaikangVideoManager.getRTSPURL(cameraID);
 if("".equals(url)) {
 Toast.makeText(context, "url invalid", Toast.LENGTH_LONG).show();
 return;
 }
 mLiveControl.setLiveParams(url, HaikangVideoManager.mName, HaikangVideoManager.mPassword);
 if(mLiveControl.LIVE_PLAY == mLiveControl.getLiveState()){
 mLiveControl.stop();
 }
 if (mLiveControl.LIVE_INIT == mLiveControl.getLiveState()) {
 mLiveControl.startLive(surfaceView);
 }
 }
 }.start();

How to solve this problem? you can do as follow step.

Step 1: Find position of problem occurred

Only when i find position of problem occurred, we can solve this problem easily, by logcat tool in  eclipse, we can find it very easily.

Step 2: Analysis this problem and Solve it

By Logcat tool, i know this problem occurred in Toast.makeText(context, “url invalid”, Toast.LENGTH_LONG).show();

Then i know why this problem occurred, because Tost.make should be run in main thread in android, but no in a sub thread.

To solve this problem is very simple, remove Toast.makeText(context, “url invalid”, Toast.LENGTH_LONG).show();


In Android project, we often have to get the height and width of a device, so that we can change our size of our ui to adjust to different devices, In android, to get these two information is simple, you can do one step.

Step 1: Use DisplayMetrics to get width and height of a device

In android, wen can use class DisplayMetrics to get the with and height of a device, code like this:


private void getScreenSize(){
DisplayMetrics dm = new DisplayMetrics();
this.getWindowManager().getDefaultDisplay().getMetrics(dm);
int screenWidth = dm.widthPixels; // width of screen
int screenHeight = dm.heightPixels;// height of screen
}

From code above, the screenWidth and screenHeight are what you want.


In an android project, I need create a oval shape textview to show some warning information, a demo like below.

oval shape textview in android

In this demo, i created a oval shap textview to show “This is a text”, if you also want to realize it, you can do as these steps.

Step 1: Create a background drawable xml file for this textview

You can create a xml file in res/drawable , it may call floatwarning_text.xml, then you can copy code below into this file and save it.


<?xml version="1.0" encoding="utf-8"?>
<shape xmlns:android="http://schemas.android.com/apk/res/android">
 <solid android:color="#cce8cf" />
 <corners android:radius="100dp"/>
 <stroke android:color="#cccacb" android:width="1dp"/>
 <padding android:left="5dp" android:top="5dp"
 android:right="5dp" android:bottom="5dp" />
</shape>


In android programming, we often should create bitmaps from a byte array, for example, when you want to take picture, you should create a photo from a byte array, meanwhile when you want to show a image from online, you also need create a bitmap from byte array.

So if you want to create a bitmap from byte array, if can do like this:

Step 1: Get a byte array which contains bitmap data

If you want to create a bitmap from a byte array, you should be sure this byte array contains the data of a image, if not we will not create one. This byte array can be got easily, for example, this byte array can be create by camera, reading a image on local or online website.


If you have prepared environment of running android in eclipse, you can create an android project by it, the action steps is simple, you can do as follows:

Step 1: Open eclipse

Eclipse ico you can click Eclipse ico like this to open eclipse.


Method setImageDrawable(Drawable) is usually used to change image of imageview, If you have a png image in res/drawable folder in android project, you can use it as follow, meanwhile, if you do not know how to use it in android, you also can read steps below.

Step 1: Create an android project in Eclipse

You can use eclipse to create an android project easily and quickly, after you have done, you can continue;